

So your hoverboard is giving you a headache?
-Don’t worry, we have the quick-fix that will solve your hoverboard problems 8 out of 10 times.
The best part of this solution to most of your problems is that it won’t cost you a dime, takes literally 10 seconds, and there is no need for tools.
Many problems that surfaces are due to misconfigurations on the gyro board. Most often they are off balance and in that state your hoverboard does not know if you’re on a flat surface, going up/downhill or even if you are standing on it or not.
If you still haven’t found that that perfect hoverboard, check out our top recommended models.
Problems that might occur due to misconfiguration or altitude leveling issues
Here are some very common problems that can be fixed by recalibrating your hoverboard.
- The hoverboard is shaking when you mount it or go uphill. This happens more often if it’s kids who are using the hoverboard, due to their low weight the gyros have a hard time keeping you in balance if they are not correctly configured.
- It might beep when you start it but won’t let you take off.
- You have the hoverboard in perfect balance but it still wants to spin around.
- When you ride the hoverboard straight it draws to the left/right.
There are numerous more problems that can be helped with a re-calibration of your board and we highly recommend everyone that has a problem with their hoverboard to test calibrating it first, before you start looking at repair options like changing your motherboard or the altitude/gyro boards.
Step-by-step guide to calibrating your hoverboard in 10 seconds
Follow the below step-by-step guide on how we calibrate a hoverboard and you might just save yourself a 100$ in spare parts + work involved, in as little as 10 seconds.
- Make sure your hoverboard is standing on a flat surface and with both upper LED-indicators in level with each other.
- Press the onboard power button and keep it depressed.
- Your hoverboards front LED-lights will blink fast 5 times before it starts blinking with a longer interval.
- Release the button and restart your hoverboard.
You’re done calibrating the altitude/gyro boards and your hoverboard is now perfectly leveled. It now knows in what direction you’re riding and what incline it’s currently going in. The best thing about a calibration problem is that it’s easy to complete and you can do it wherever you are.
The difference between each hoverboard model
There is one slight difference between each hoverboard models calibration process, and that is the position of the on/off-button used to complete the process. Below we have illustrated where each model has its power-button so you can easily locate it in order to start the process of calibrating your hoverboard.
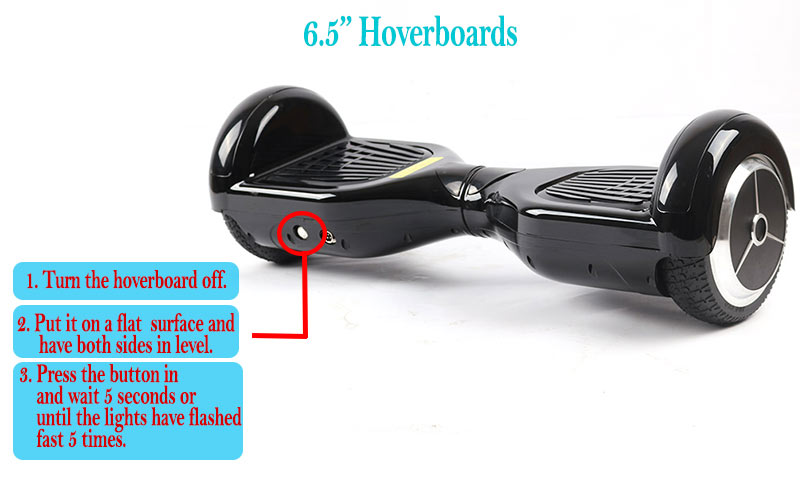
6.5″ models
On the most common model which is the 6.5-inch classic version, the power-button can be found on the back of the left side of your hoverboard. Nicely mounted right beside the charging port. See the image below.
8.5″ models
The 8-8.5″ models have their power-button mounted just like on a classic 6.5-inch hoverboard. The silver button which powers your hoverboard on/off can be found on the back of the left side of your hoverboard. Press and hold it for 5 seconds or until the lights have flashed fast 5 times in order to complete the process. Then all you have to do is restart it all over again. Check the image below for reference.

10″ models
The 10″ models are among the biggest on the market and depending on what brand you’re riding they can have their power-button mounted in two different places. The first and most common place is underneath the right side of your hoverboard. Some also have it mounted just like on the 6.5 and 8.5-inch models which are on the back of the left side. The process, however, are exactly as on the other models. Check the image below and you’ll see the exact location of each model.

Calibrating the hoverboard with a mobile application
Some hoverboards are equipped with Bluetooth transmitters that let you connect to them through your phone. If this is the case with your hoverboard it might have a mobile app, that mobile app can also be used to calibrate your unit in order to reset its gyro boards. The process is similar except that you press calibrate on your phone instead of holding the hoverboards power-button pressed for 5 seconds. Below we’ve made a step-by-step guide on how the process is done via the mobile app.
Let’s use Taotao’s mobile app in this example as it should be able to work on most hoverboards. Why might you ask? Well, that’s because most brands applications are just rebranded from their model. They are the most commonly found motherboard and gyro factory and hence most brands who know their shit uses them in their models.
The process:
- Connect to the hoverboard with your mobile app.
- Make sure the hoverboard is standing on a flat surface and that both sides are in level with each other.
- Go into the “your brand” mobile application and find where it says something like “calibrate the unit”.
- Follow the on-screen guidance. It’s the same stuff that I just told you to do.
- Press the button, wait for 5 seconds and restart the unit.
- Done!
You have now completed the calibration process through your phone and are now ready to roll! Just make sure you do the process correctly as the Bluetooth components in the hoverboards have been known to crack during calibration. I think it’s been fixed on most newer units. But if you have an old one, be sure to go through the steps more carefully.
Important facts about calibration
So there are numerous different models of hoverboards and we cannot know exactly which one you own but the general way of calibrating your hoverboard is the same for all the models we’ve tested.
Some do have mobile applications that let you do this through your phone. But this will still be the simplest and most effective way to get it done. If a re-calibration won’t fix your problem you are probably having issues with one of the following things:
- Motor problem
- Mainboard
- Gyroscope board
In my experience, the most common problem is the mainboard. In our own hoverboards we only use TaoTao and since early 2016 when we made the switch, problems have gone down by over 90%. We sell around 2,000 units per year and we have a 1.5% faulty rate, most of which are due to factory mistakes and handling.
Remember to do the process at least once more if your hoverboard problem isn’t fixed the first time. Perhaps you did it wrong or let go of the button too soon. You wouldn’t be the first, nor the last.
If you have any questions about the calibration-process or anything else feel free to leave a comment below!


i make a wrong calibration for my hoverboard in the switch method
and now the two led green lights and the indicator led on mainboard blinking once
when i try to make new calibration
when i press 6 sec on power button it give sound like “tet” and two leds green light but indicator red led in mainboard blinking 7 times
i checked it hardware no error and no lose connection
it be like that from the wrong up side down of calibration i do first time
Sorry for my very late reply Eceman. I would suggest that you do a hard reset. Which means remove the plastic on the side opposit to the charging port on your hoverboard. There you will find the battery. Unplug it for a few hours (just to be sure often a few minutes will do just fine). Then try and make a new calibration.
Best of luck!